Finding GP Tables – the basics

Here is part of a recent post from the Suggestions /Questions  page:

“I understand how the builder works but can’t figure out which tables to connect. I can find ways to see part of the information but not all. ” 

The writer continues to talk about what exactly she is trying to get.  Now I debated this… her request was pretty easy, I could have just replied with the table names and link fields.  BUT, I strongly believe the in the theory of “to teach a man to fish”   And hey, this is a blog…

So, sorry Sandra, I have decided to make your question the subject of two posts. This post will focus on tables in general.  The next post on the type of table you are looking to link – distributions table – which, since GP IS an accounting software, deserve a separate discussion.

First suggestion is a trick for GP10 and above.  I didn’t find this — a co-worker (thanks Coleen) found it when she was new!  

  • Go to the window in GP that displays the data you are trying to find.  (Make this the simplest window that contains this data.  Don’t go to an inquiry window with tons of other data!)  Also make sure you are on the same type of transactions (Work, open or history)
  • On the top menu of the window select Tools >>Integrate >>Table Import
  • You will see a screen with the list of tables used on this window!

OK – so now you have a list of table names.  Ok actually they are Display Names…  It is important to mention that GP doesn’t have just one name for each table. They have 3 different names:

  • Display Name – this is the name we work with by default in the Builders
  • Technical name – this is what is actually used by Report Writer and other programing languages.  It doesn’t have spaces it uses _ instead
  • Physical name – this is the name in SQL.  Most blogs refer to this table name since most blogs are for SQL or VB programmers.  

Now you can go check out this list of tables under Tools >> Resources >> Tables.   Here is a great write-up on using this window: Table Resources  Notice the Product & Series just like we need when adding tables in GP.  Remember you can see all of the field data here too.

I actually often look for the Physical name on this screen – since there is a logic to the Physical names as explained by Leslie Vail’s post  GP Table names – Physical or SQL names  (And if I totally lost you above when I mentioned Work, Open and History – make sure you read her post: Moving from Work to Open to History – or to just get a refresher by module!)   

You will also learn that there are certain naming conventions within the other name types too.  SQL master tables often have MSTR  or Master in their other names too. (The problem is that these other name types tend to be a little more “flexible” with the naming conventions!)

Advanced techniques for the programmers and the brave 🙂   (many of these tools standard GP users do not have access to.. but if you do – go for it!) David Musgrave’s  Finding table and field names

Now – as for link fields – I am going to refer you back to my post: Adding additional tables to your SmartList (Successfully)

That should be enough to get you started…  I think I will need to do a follow-up on tables for other products (HR, Project, etc…)  but that is a subject for another day.

Happy Building,
Devon

07/30/2010 – Author’s Note – take a minute to also review the other links and resources from our friends on the Blogging World in the comment section. 

Most resources the merrier I say!   Thanks everyone for your contributions & additions.
Date & Time fields in GP Builders

Typically – most fields in GP are Date fields.   GP doesn’t have many fields where time is stored.  

Side note – Many of you know that GP added a time stamp field into many GP tables for version GP10 (field – DEX_ROW_TS in SQL).  But unfortunately – this field in NOT available in SmartList builders (hint, hint, GP programmers – that might be nice….) Unless you connect to the GP table like it is another SQL table…

A little background is necessary…  Actually in SQL all GP date fields are actually date/time fields.  It is just that the time is always 12:00 am.   This assumption is built into SmartList and the other builders.  In the field formatting you can only select formats with dates, not with times. 

This can cause issues when you are working with data in the Builders from other SQL data sources.  SmartList builder assumes that the field is just a date field and only gives you those formats.  That seems OK, until your users try to do searches on these fields like they are used to in GP.  Such as equal to 07/26/2010 … if there is actually a time in this field then the users will not get what they expect (chances are no records will be returned – because the search is actually looking for 07/26/2010 12:00 am !)

To prevent this and make the date/time field work like date field in GP, make a new calculated field with a Field Type of Date and the following calculation:
CAST(FLOOR( CAST( {table.field} AS FLOAT ) ) AS DATETIME)

If you want the users to see the time from this orginal field, you will need to add another calculated field use as Field Type of String and the following calculation:
CONVERT(CHAR(8), {table.field}  , 108)

Now, if you SQL people have better functions, please let me know (I don’t begin to claim much of a SQL background) – but these have worked just fine for me.

Hopefully, this trick will come in handy the next time you are using the Builders to view data from other SQL sources.  (Which is a great feature of the Builders!)  If you have other SQL data that your people need and use, why aren’t you leveraging the Builders to see that data in GP?  But that is whole other subject entirely.

Happy Building,
Devon

Excel Report Builder – GP2010 Pivot Tables – Sales By… anything!

I do a lot of “Sales by” SmartLists for clients for sales analysis.  Sales by Customer; Sales by Salesperson by Month, etc.   You often end up with quite a large list of SmartLists for each different report that different parts of the organization wants.    That is why I am pretty excited about the new Pivot Table option for Excel Report Builder in GP2010.    (Now – don’t stop reading if you are on GP10, I have a trick for you so that you can use Pivot Tables too!… If you are on GP9, sorry…)  

Now – If you haven’t used Pivot Tables in Excel – boy have you been missing a great tool for analyzing data.  They make it so easy in Excel 2007.  If you are a newbie, play with that first to get an idea.  Take a SmartList and dump the data to Excel. Go to a new worksheet, press the Insert tab on the top and on the far left you should see PivotTable – click on that.  A screen will come up asking for your range of data to select – go select your exported data.  and Press OK (See Excel help for more details …)  You will now see this screen:

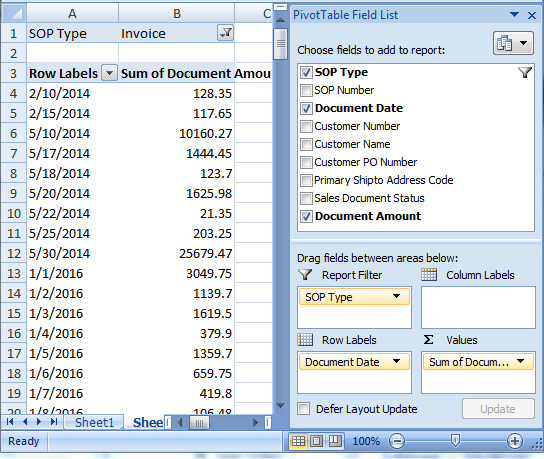
Now you want to drag your fields into each of the sections – like this:

And by magic – there is your summarized data.  
Want to add customer?  Just drag that field into the proper section  
Want a report for a certain date range?  Drag the Document Date field up to the Report filter and change the dropdown to only select certain dates.
Want each month in columns?  Add month to the column section… and so on.  So easy most people can get the hang of it.

(note – Double click on the field name in Values section to get the screen to select Sum rather than the Count that Excel will typically give you – also you can format your data here)

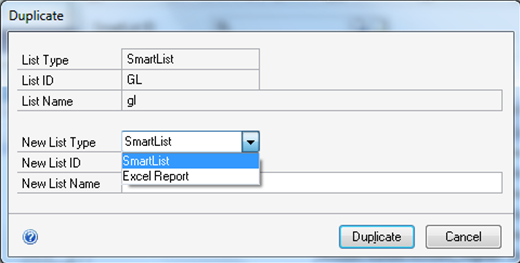
Now I am going to assume that you already have a Summary Sales by SmartList that you are using in SmartList Builder (See my post – Summary SmartLists in Builder (Sales by Item for a date range, etc)) so I won’t cover those same items here.   Remember items like restrictions, proper signs & quantities.     You can duplicate that SmartList into Excel Report Builder (See my post – Making a copy of a Builder SmartList) … or start a new one. 

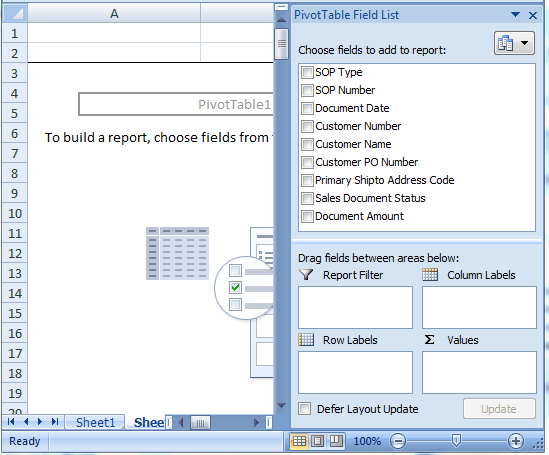
The steps for exporting are exactly the same as a regular Excel Builder Report.  But when you launch the Excel you will not see a screen full of data, but instead you will see the first screen shot above.  In the field list you will see all of your fields selected on the Excel Builder for that report. You can build it for your users and save it – or leave it “blank” for users to build as they desire.  (Note – You can close the section on the right if you don’t want users to be tempted to change it – but you will also want to make sure they don’t have “write” privileges to the folder in Windows either!)

One of the feature of PivotTables you will not be able to use is some special date features in Excel ( the ability to select Years & Months for a date field) – but adding a couple calculated fields in Excel Report Builder will take care of this problem: 

  • Month – field type integer – MONTH ( {table.field name} )
  • Year –  field type integer – YEAR ( {table.field name} )
  • Quarter  –  field type integer –  DATEPART (q, {table.field name} )

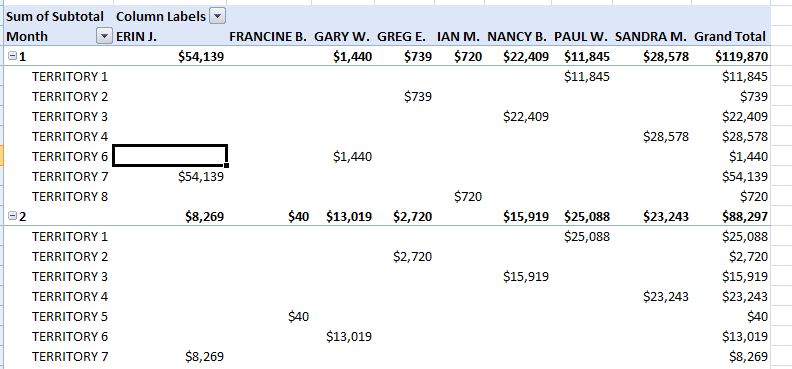
Before you know it you will have something like this:

There are a lot of tricks to PivotTables in Excel – if you are not familar with them I would suggest looking on the web or Youtube for some training to best make use of your data.

Now – How about those of you on GP10?  

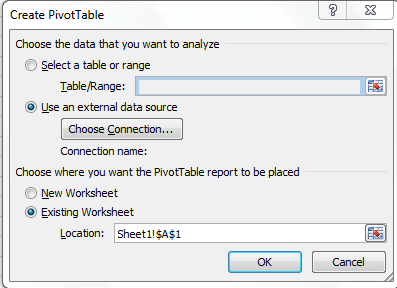
Make your Excel Report in Builder like normal.  (Or use one of the “stock” ones from GP)  Launch your Excel Report. Go to a new worksheet and press the Insert tab on the top and on the far left you should see PivotTable – click on that.  On the screen that comes up change the option to “use an external datasource” and press Choose Connection button

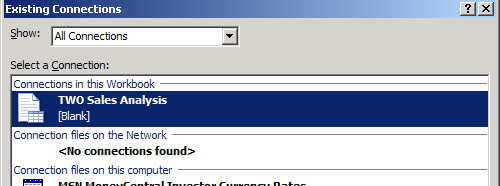
the next screen will show your data connection created by Excel Report Builder, select it and press the Open button on the bottom (not shown)

Press OK back on the Create Pivot Table screen…and you will find yourself looking at the Pivot table wizard with your GP data!  (You could delete the worksheet with the data (one made by Builder) and save this Excel as a different name.  Now it won’t be overwritten by Excel Report Builder.)

Try it – you will start to love PivotTables too…

Happy Building,
Devon

PS – If you are on Excel2003, and you have the download to open Excel2007 files – you can still use the PivotTable features – it’s just that the steps are completely different – if you web search you should find the how to this…